top of page

Satoshi's Mug
Getting to know your product
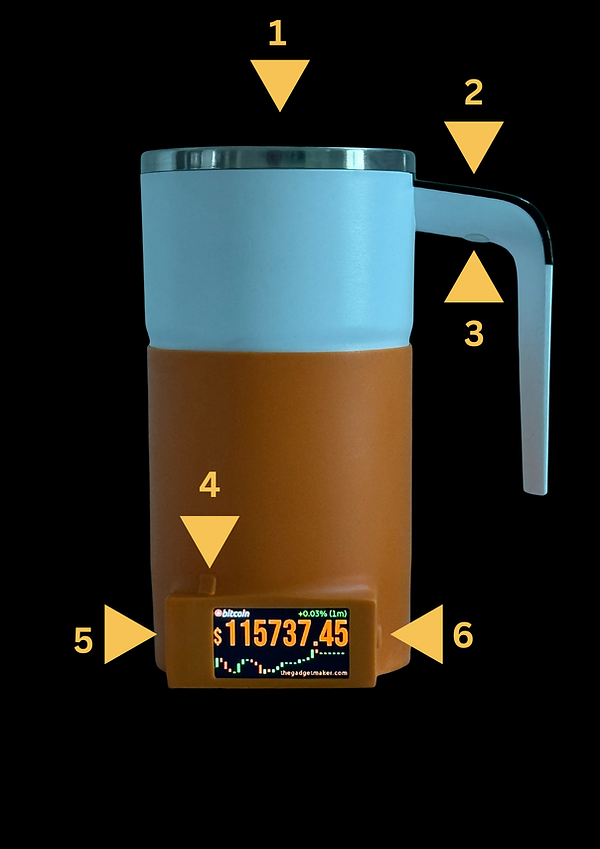
1 - Magnetic Mixer inside.
2- Digital Temperature Display. (know your coffee , tea or your favourite drink's temp)
3- Mug charging port (use USB cable).
4- Reset Button (for Smart Bitcoin Sleeve).
5- Smart Bitcoin Sleeve charging port
(use USB cable).
6- On/Off Switch for the Smart Bitcoin
Sleeve Display.
Setup Instructions

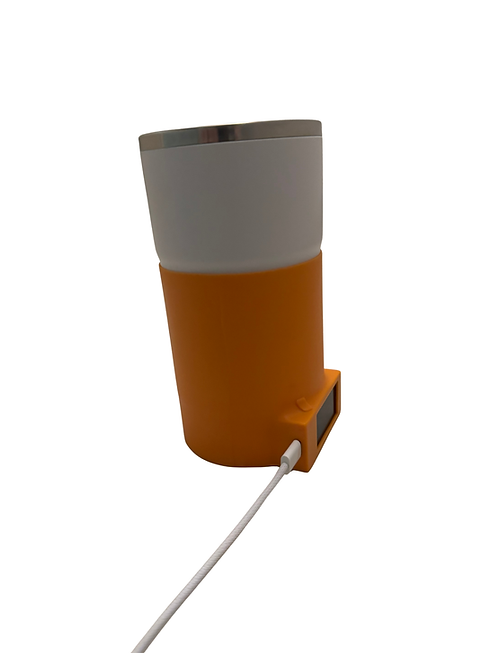
Step 1 :Charge the Mug with the USB cable provided. Use the USB port marked with 3, on the inside of the handle (see picture above). Note that this will only charge all the Mug functions, and NOT the Smart Bitcoin Sleeve.This will be done in the next steps.You can use any USB phone charger. Charge for around 30 minutes.
Step 2a:
FIRST connect the USB cable to the Smart Sleve via USB port at position 5 (see picture).

Step 2b:
Once the USB cable is powered and connected you should see the screen illuminate and display the company logo.

Step 2c: VERY IMPORTANT
Now check the area around the RESET button to see if you see a faint red light inside. You can use your fingers or hand to create a shadow to better detect the red light.
A) If you see a red light it means your device is ON and charging, so you can CONTINUE to next step.
B) If you don't see a red light, press the POWER-ON button once (position 6). You should now see the red light, and you can continue to the next step.
Note: If the power button is not ON when you plug the usb cable, the screen will illuminate ,BUT the internal battery will NOT charge.

Step 3a:
After a few seconds, the display will show a different screen, prompting you to setup WiFi.

Step 3b:
Open your mobile phone and go to the settings, where you normally look for existing WiFi networks. You should see a list of networks, including TGM-Ticker-AP.
Select this network.

Step 3c:
Once it connects it will indicate it has no internet access or that is an unsecured network.This is ok and normal, as you only need to connect to it temporarily to configure your own network.
Step 4a:
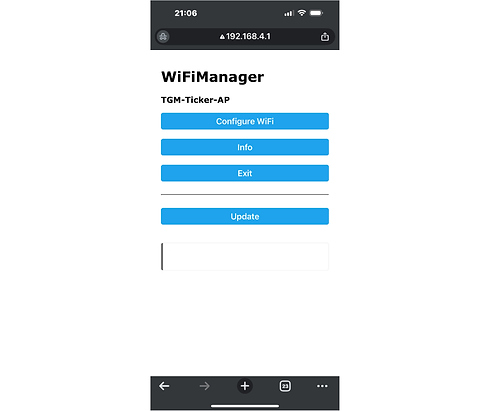
Now open any browser (chrome, firefox, etc) and type 192.168.4.1 at the top in the URL box.
You will see this screen. Press "Configure WiFi"

Step 4b:
Enter or select your own WiFi network SSID (name) and Password and press SAVE.
This setting is for your Mug to connect to the internet via your WiFi router next time it's turned ON.
In the example it says "Your own network" but in reality you should selectl your own network name. Select it and the type your password for this network.
note: make sure you pressed SAVE.

Step 5:
Congratulations this is the final step, you are almost there.
Just wait around 15 seconds and the device should connect automatically to your WiFi network and display the price of Bitcoin.
IMPORTANT: It's recommended to leave the Smart Silicon Sleeve charging with the USB cable connected for around 1 hour. Then you can disconnect the USB cable and run the device on the internal battery.
Note that your Mug will remember this network settings from now on.
bottom of page